 |
|
|
Home →
Techniques →
Tracking Box
How to Build a Tracking Box
by Walter Muma
|
| |
|
What is a Tracking Box, and what is it used for?
A tracking box is a 4 by 8 foot (or whatever size) box filled with sand about
8-10 inches deep. Basically a large shallow sandbox. It is used to study tracks.
The purpose of a tracking box is to be able to practice your tracking skills
in a controlled situation. A tracking box may be built either indoors or
outdoors.
An indoors tracking box is used for the detailed study of pressure
releases in a controlled environment, in the absence of weathering factors such
as wind and rain.
An outdoors tracking box is used for this as well, except the tracks
and marks are subjected to wind and rain. The effects of these weathering
agents can then be studied. As well, an outdoor tracking box will show the
tracks of whatever animals and birds walk through it.
Either type of tracking box can be used for studying human tracks, and can be
used for scenarios. For example, one person can walk through the tracking
box and perform certain actions, and then the effects of these actions on the
tracks can be studied.
|
| |
|
|
|
|
|
|
|
|
|
Where to locate your tracking box
Whether you build it indoors or outdoors, place it a location where you can
move around it from all sides. You will need to be able to stand, crouch, or lie
down on any side.
If you are building it outdoors, and you want to encourage animals to walk
through it, place it on or near a well-used animal route (trail) of some sort).
As well, you may want to place it where debris is less likely to fall into it
from above, such as from trees and shrubs. Also consider whether you want
it in the sun or shade or a balance of both, since tracks age differently in the
sun as opposed to the shade.
Place the box where it's easily accessible. For example, I placed mine
right beside the trail I use to go out to the compost. That way, if I get
lazy, I will be reminded of it every time I walk out to the compost. Of course,
this could be "dangerous" too - it might take you a couple of hours to
come back from taking out the compost!
|
|
|
|
|
|
|
|
How to build a tracking box
Materials needed:
- Three boards, 8 feet long, 1 inch thick and 10 inches wide. One of
these boards will be cut in half (so have the lumber store do this for you
if you don't have a saw). If the tracking box will be outdoors, you may wish
to get cedar boards (they will rot slower) or paint the boards with paint or
preservative of some sort. But keep in mind that the use of many
preservatives or paints may repel animals and birds.
- Sand - You will need about 600kg (approximately 1300 pounds) to
fill a tracking box 4 feet wide by 8 feet long to a depth of about 8 inches.
This will be the most expensive part of the tracking box: In the summer of
2001 I built a tracking box and the sand alone cost $100 (Cdn).
Another way to get sand is by the truckload. One person said they bought 1
ton for $20-30 and it was just enough.
The best type of sand to get is Play sand (sandbox sand) -- it's the purest
and cleanest type, so there are fewer impurities to distort the tracks.
- Plastic sheet
- Nails - ardox (the kind with the spiral in them) galvanized 3 inch
nails are best. Use 4 per corner; therefore you will need 16. You will also
need a hammer, of course.
- A smoothing device, such as a length of 2x4. This is to smooth out
the sand.
- Garden rake: this is to rake away the marks and tracks, and to
fluff up and generally work the sand.
- Optional: A cover for the box: a 4x8 sheet of plywood.
Wherever you build the tracking box, that spot is where it's going to be
forever: 600kg of sand is pretty heavy! I have heard of people building them
with a strong, thick 4x8 foot sheet of plywood as a bottom and then attaching
wheels, but you would need strong wheels and probably more than just one at each
corner. Also you then have the problem of ensuring that the box doesn't not move
or shake even a tiny bit while using it.
If you build it outside, level off the spot where you are building it.
If it's not level, then all your track analysis will be done with the effects of
the slope showing in every track. You might forget this and then all your
training will be skewed.
The two uncut 8-foot-long boards form the sides of the box and the board
that was cut in half forms the ends. Nail all of the pieces together
to form a shallow frame on the ground (or floor). Use 4 nails per corner. You
want it sturdy.
The plastic sheet is used to line the box. Whether you bring the
plastic sheet up the sides, or up the sides and over the edges, or merely line
the bottom with it, is a matter of preference.
If you bring it up and over the edges in an outdoor box, various bugs and
insects will get under it. Also the wood may rot more quickly because
moisture will get trapped under it.
My preference is to simply lay the plastic over the bottom of the box and up the
sides a couple of inches, so that it is completely buried when the box is full
of sand.
For an indoors box you should probably extend the plastic up the sides and over
the edge. This will help to keep the boards dry (the sand will be damp).
Then simply fill the box with sand. Don't fill it up right to the edge
- a lot of it will simply spill over the edge during use.
|
| |
|
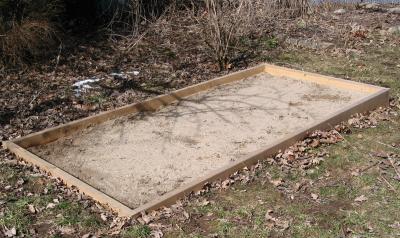
Completed tracking box |
|
|
|
|
|
|
| |
|
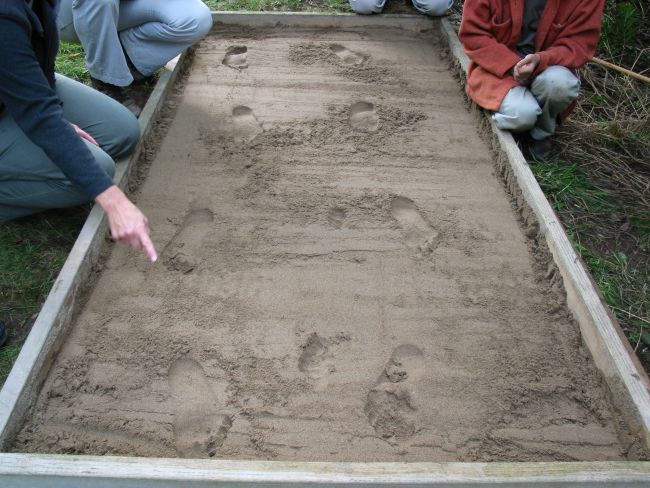
How to use the tracking box
The sand should be dampened and fluffed up. How much you dampen it and fluff
it depends on what you want to do with the box. For example, you would pack it
down harder if you want to study tracks in harder sand. Then smooth it over with
a 2x4 or something flat and smooth.
Here's just some of the various things you can do with a tracking box:
- Simply leave it uncovered and wait for animals and birds to walk through.
Then go and try to figure out what they were doing while they were in the
box.
- Bait it to attract particular animals or birds.
- Walk through it, doing various things, and then analyze the pressure
releases in your own tracks. Try to find the micro pressure releases that
are taught in the Advanced Tracking class.
- Have someone else walk through it while you're not looking, and then try
to figure out what they did as they walked through. For example, they might
walk through while looking to the left or right. They may walk, stop and
then continue walking. And so on. The possibilities are endless!
- Perform the "wisdom of the marks" exercise. This is basically an
exercise in learning to age tracks. Make a set of marks with the end
of a broomstick. Come back in perhaps 6 hours and analyze the degradation
and weathering of the marks over the 6 hours. Make another set and
repeat the process. You can stretch this exercise out over several days or a
week.
- Examine and watch the effects of debris falling on the sand.
- Make your pet dog or cat walk through the box under different conditions
-- hungry or have just eaten, excited or unhappy, need to pee or have just
peed, etc. etc.
You may wish to cover the box if it's outdoors and you have a set of tracks
or marks that you want to preserve and delay the weathering process, or don't
want other animals to mess up. For this you will need a 4x8 sheet of plywood
(and somewhere to place it when it's not covering the box).
Enjoy!
|
|
|
|
|
|
|
With apologies to blondes
everywhere....
Two blondes were walking through the woods and came upon
a set of tracks.
One blonde said that they were deer tracks.
The other blonde said that they were moose tracks.
They were still arguing when the train hit 'em. |
|
|
|
|
|
|
|

