Home →
Awareness
Recreational Sweatlodge
by Joe McDonald
The use of a steamy sweat bath dates far back into history. The variations in
building styles, geographic locations, dates in history, and types of usage are
interesting. From the ceremonially used Aztec "temazcalli", which was
a small circular or rectangular adobe structure, to the Russian "bania",
which is a small one-room log cabin. The West African Mandingo people treat some
illnesses by lying a patient on tree branches set over hot ashes, then by
pouring water over the branches the patient is soon enveloped with steam. In
France during the Middle Ages the sweating type of bathing was called "estuver".
The Japanese and Irish had their versions also. The word sauna originates from
the Finnish people and is probably the most popular name given today to describe
the water vapor sweat bath we're talking about. The use of some type of
sweatlodge was very common among the North American tribes and even some South
American tribes. Uses range from medicinal to social, from spiritual to
hygienic.
Remember back to your standard class, all those good memories connected with
having a sweat together. Maybe it's time that you think about building a
sweatlodge for your own use. As you look back across your old notes you can see
that they're a bit sketchy. So this article is going to pump some confidence
into the ol' veins. Let's see if we can get rolling -- besides, the only way to
really learn is by doing it.
The location is the first consideration because you want an area with
accessibility to a fire. Your township, city or county ordinances may not allow
an open fire. I recommend checking things out with the officials in your area.
One student wrote to me with that problem and he got around it by building an
oversized barbeque pit. You also want to select a little dimple in the landscape
to set the lodge on, some place where water drains well. Watch out for even
slight dips because after you dig a hole down for the bucket, it's going to
flood out in wet weather.
Another consideration is the size of the lodge. How many people do you want
to fit? An easy way to determine the dimensions is to set the rock bucket down
and sit as many people around it as desired. You'll be able to see the outer
circumference. Measure directly across the circle (cutting it in half) to get
the diameter. We had a seven foot diameter sweatlodge here at the farm that fit
eight people. When you're considering the size, you can make it a space or two
larger for some friend you might want to share the experience with. Also, you'll
be able to stretch out more during a hotter sweat.
The biggest item on your list of materials is green saplings, the best of
which are gathered in a mature woods where they have to grow fast, thin, and
straight to get as much sunlight as possible. These thin, green saplings bend
easily and make up your main vertical poles and lattice works. The length of the
saplings depends on the overall size of the structure. Make a drawing of your
lodge-to-be using a scale of one-inch equals one foot, and measure how long the
saplings need to be. Then convert the inch measurement directly into feet.
Remember to include about two feet for tying overlap and one foot for burying
into the ground.
The tools you'll need vary with the type of ground you're working with.
Here's a list that should cover almost every type: shovel, post hole diggers,
pick axe, knife, axe, hatchet, wood saw, two stakes, sledge hammer, cordage
(bailing twine), and the metal bucket that you're going to be using for the
sweat. A lot of things throw in variations that you're going to have to get
through as you build the sweatlodge, such as the location, available materials,
and tools used.
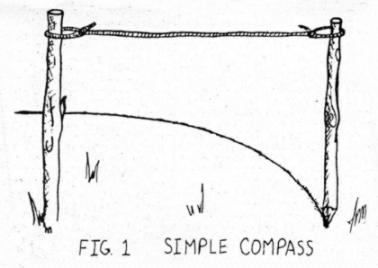
I recommend making a small to medium-sized lodge -- they tend to lend
themselves nicely to a six or eight vertical sapling setup. Figure 1 shows a
simple compass that will help you plot out a basic circle. Then, depending on
the number of verticals you're going to use, mark out their locations. Try to
get them equally spaced. Also, remember to face the door East. Directly in the
center of the circle, dig a hole to accommodate the bucket up to the rim. Remove
the dirt and place it about ten feet from the entrance in a mound shape.
When you're digging the vertical sapling holes you can use a shovel, pick
axe, or post hole digger. It depends on what type of dirt you have -- in sandy
soil you could get by with just a digging stick.
The easiest way to do it is just take a stake and pound it into the ground
using a sledge hammer, wiggle it around as you go and remove it when the hole is
deep enough. You need not go any deeper than a foot.
|
When you're setting the saplings in their holes, check the bending out. If
the sapling is too thick it won't want to bend well. Sit someone down on the
inward side, where the bend goes over their head, so you can see where the
sapling needs to be thinned out to make the bend go just right. Figure 2 shows
the thinning process. You can do it with a hatchet while it's still in the hole
or mark the spot and pull it up so you can carve it out on the ground. Don't
thin it down more than half the thickness. |
 |
|
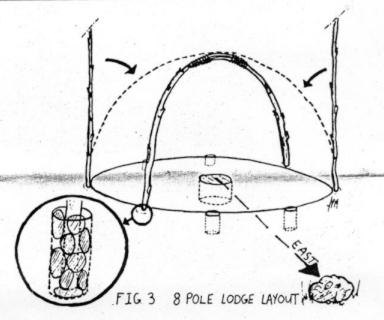
Figure 3 shows two bent and tied saplings. There are also two still vertical
which need to be bent down and tied where the dotted lines and arrows
illustrate. The enlarged insert shows the butt end of a sapling in the hole
filled with rocks and dirt. The rocks are compressed by hammering them down with
a sturdy stick and a sledge hammer. This method gets them tight and holds the
saplings real good. |
 |
|
When you tie the tops together you can check the shape of the loops and
adjust them to one another. If one sapling is sticking out too much, pull it in
a lot tighter and choke up on it while tying. The rest of the structure will
help support it and the outcome will be a better dome shape.
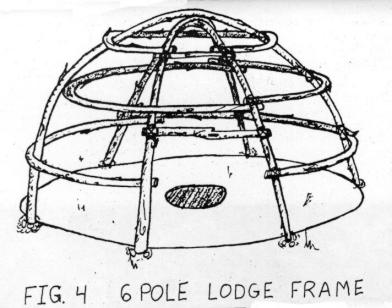
For the lattice work, simply tie saplings around the outside of your dome.
Try and get at least three or four layers on up, leaving space for the door. In
Figure 4 you can see where a sapling weave was used on the left hand side of the
illustration. The sapling going around the bottom starts at the door, on the
inward side of the lodge, then weaves outward of the next vertical and then
inward again for the upright in the back. The next lattice up from that does
just the opposite -- they alternate. This is another way of doing your lattice
work. I recommend using cordage to tie up any point where saplings meet to make
it stronger. The diagram also shows that the main poles are not tied at the top
but bent all the way over so both ends are buried in the ground. At the top, and
left side of the illustration, I didn't show the saplings as tied together. This
gives you a better view. When everything is tied up, go inside and trim off all
of the knots that will poke you in the back when you lean on the frame for
support during a sweat.
Now, all that remains of the construction is putting a door on and covering
the lodge. In the space you left in the lattice work, tie up a good top piece
that will be used for attaching the top of the door. Since the lodge will be
covered with plastic, you will need a breathable door such as an old rug,
blanket, or sleeping bag. The first layer covering the lodge should be plastic,
this keeps down the growth of mildew. Then layers of old carpet, mangle
covering, or canvas can be added. A good source of canvas is old Boy Scout
tents. It's good to have at least one lightproof layer over the lodge so it will
be dark inside, even during the. day. Finally, cover the whole thing over with
debris.
A few last adjustments may be in order now, such as cleaning out the inside
and putting bedding down -- we use straw. Check and see if there are any light
holes visible. Adjust the door so it is easily flipped up, and when down, covers
the opening adequately. Put all the tools away and clean up the area.
When gathering rocks for use inside the lodge remember to obtain them from a
high, dry area, such as an open field rather than a drainage ditch, and never by
a river. You don't want any chance of them exploding. Heat the rocks glowing
red, like the coals of the fire. If your bucket is galvanized, you must burn off
the coating prior to use because it releases a poisonous gas when heated. Place
the bucket into the fire and let it get hot all the way around. Then remove it
and let it cool.
I use a pitchfork to retrieve the hot rocks from the fire and place them into
the metal bucket. Once the bucket is full, I insert a stick through the handle
and have someone help me carry it into the lodge and place it into the center
hole. If the bucket doesn't have a handle, fabricate one out of chain.
|
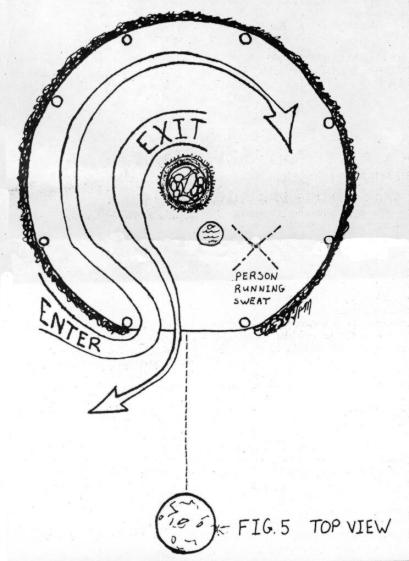
To the Native Americans, the whole sweat lodge represented the Great Spirit
and Mother Earth. The dome represents the back of a turtle (Mother Earth) and
the mound out front is the turtle's head (Great Spirit). An imaginary line
between them is the neck of the turtle and this shouldn't be crossed over by
anyone. As you face the lodge to enter it you go in on the left side and go
clockwise around the bucket (see Figure 5). To exit just reverse your movement.
Being inside the lodge represents the womb of Earth Mother. Her bones and blood
are the rocks and water that you use to create the steam. |
 |
The person who is running the sweat enters first. This person should be
someone who has taken a class here or has the most experience with taking
sweats. All of the water that goes on the rocks is controlled by this person.
There can be other buckets inside for people to splash on themselves. Everyone
should keep their hands, faces, or any other parts of their bodies from being
over the rocks. Since it is dark in there you don't know when the next cupful of
water is going to be thrown on and you'll be burned by the steam. The only other
things that I can recommend that can go on the rocks are sage, sweetgrass, or
the evergreen growth of cedar. Also, yarrow or mint brewed up into a tea and
that thrown on the rocks.
Anyone that is going to be sweating, remember, no alcohol or drugs before or
during. Any questions about physical ailments please consult your doctor,
especially high blood pressure or any heart disease. It will be easiest to
explain what you're doing to your doctor by asking him if you can take a hot
steam bath or sauna. If you have poison ivy, rinse off immediately afterwards
with water. If you use soap, make sure that it's a non-oil-based type. Women in
your moon, please refrain from sweating.
The following morning after the sweat I like to remove the rock and water
buckets. Also, prop open the door if it's a nice day to air out the lodge. After
many sweats you might want to change the bedding to fresh material.
If I was in a "survival situation" and wanted to build a
sweatlodge, it would be very low on my list of priorities. However, I would
simply take a digging stick and dig out the hole in the center and line it with
rocks. Use a fire-hardened stake and a log or rock to put the holes in for the
vertical saplings. I'd use sharpened rocks and/or fire to cut the saplings down.
Cordage would be reverse wrapped plant fibers. I'd cover it with hides or thatch
it in, and "survival cement" over that. A door could be made out of a
mat weaved from reeds or cattails. The hot rocks would be handled with forked
sticks and a water container could be a burned out bowl or even an animal
stomach.
The following paragraph states my personal feelings. I don't mean to push
them on anyone. Everything I do in consideration with the sweatlodge is done
with respect. Since I'm going to be using it as a tool to get closer to the
Earth, then even the act of building it will be sacred to me. When gathering
materials, I say prayers of thanks for the gifts. By taking a sapling from a
mature forest, I'm improving that area by cutting down on the undergrowth's
competition. Also, once the older trees die, these skinny saplings will be blown
over by the wind anyway. Even the spot claimed for the sweatlodge I realize is
taken from some of my plant and insect brothers. This is no reason not to build
a lodge. The outcome is greater than the sacrifice. Keep all this in mind -- it
helps make the whole experience that much more positive because it helps you
keep everything in perspective.
From The Tracker magazine, Spring/Summer 1983,
published by the Tracker School.
For more articles from The Tracker magazine, visit the
Tracker Trail website |